Ở bài viết trước, chúng ta đã cùng nhau tìm hiểu về các thành phần, quy tắc cũng như cách viết một playbook.
Qua bài viết lần này tôi sẽ cùng các bạn xây dựng một playbook hoàn chỉnh hơn với mục đích cụ thể là cài đặt WordPress trên CentOS 7
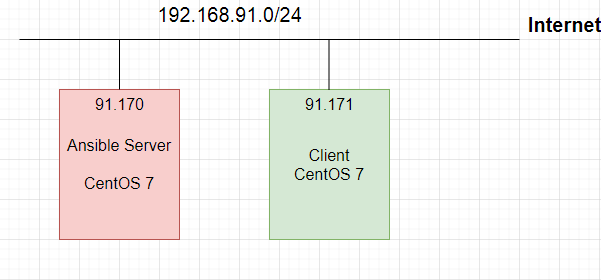
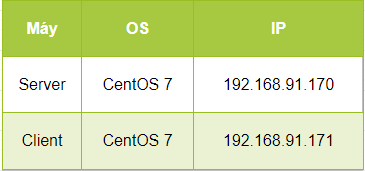
I. Mô hình


Ta sử dụng 1 server và 1 node client.
Cả 2 đều cài CentOS 7.
Trên Server đã cài đặt Ansbile, đã trao đổi SSH key.
Khai báo file Inventory:
II. Các công việc cần làm và module liên quan
2.1. Các công việc cần làm
Việc nắm được các công việc, các bước cần phải làm là điều cần thiết. Sẽ vô cùng khó khăn khi muốn tự động hóa một việc gì đó trong khi chính bản thân chúng ta còn chưa nắm bắt được quy trình công việc hay thậm chí là còn chưa thực hành nó theo hướng thủ công một lần nào.
Bởi vậy, đầu tiên tôi muốn giới thiệu qua về quy trình mình sẽ làm để cài đặt WordPress trên CentOS 7:
- Cài đặt LAMP
- Đảm bảo các service bật và các port được thông.
- Cài đặt WordPress
- Tạo cơ sở dữ liệu, người dùng cho WordPress
- Update version PHP nhằm tránh lỗi version PHP cũ không được hỗ trợ ở WordPress bản mới.
2.2. Các module liên quan
Quy trình đã nắm được, vậy tiếp theo ta cần làm gì?
Tìm các module liên quan đến những công việc nằm trong quy trình kia chính là công việc tiếp theo. Để rồi từ các module này ta xây dựng lên một playbook hoàn chỉnh.
Các module mà tôi sẽ sử dụng:
- yum
https://docs.ansible.com/ansible/latest/modules/yum_module.html - service
https://docs.ansible.com/ansible/latest/modules/service_module.html - firewalld
https://docs.ansible.com/ansible/latest/modules/firewalld_module.html - get_url
https://docs.ansible.com/ansible/latest/modules/get_url_module.html - unarchive
https://docs.ansible.com/ansible/latest/modules/unarchive_module.html - shell
https://docs.ansible.com/ansible/latest/modules/shell_module.html - mysql_db
https://docs.ansible.com/ansible/latest/modules/mysql_db_module.html - mysql_user
https://docs.ansible.com/ansible/latest/modules/mysql_user_module.html - replace
https://docs.ansible.com/ansible/latest/modules/replace_module.html
Câu hỏi đặt ra ở đây là “Làm cách nào mà tôi có thể tìm thấy chúng ?”
Cách 1: Bạn chỉ cần truy cập vào doc của ansible theo đường link: https://docs.ansible.com/ansible/latest/modules/modules_by_category.html
Và sau đó, tìm module phù hợp với quy trình công việc.
Cách 2: Bạn chỉ cần lên Google search :
ansible module + keyword bước công việc
III. Viết Playbook
Trước khi bắt đầu phần III, hy vọng bạn sẽ dành ra chút thời gian click vào đường link mà tôi đã cung cấp để tìm hiểu xem tác dụng của các module tôi đề cập phía trên.
Và tốt nhất là bạn đứng tắt nó. Bạn sẽ còn phải ngụp lặn trong đó khá nhiều lần. Hãy nhìn vào từng task, đọc hiểu chúng đến từng parameter một và sau đó viết lại theo mẫu hay thậm chí theo ý muốn của bạn.
Giờ chúng ta đã biết quy trình, có các module liên quan. Việc còn lại duy nhất bây giờ là biến những mảnh ghép này thành một bức tranh hoàn chỉnh.
3.1. Khai báo
---
- hosts: centos7
  remote_user: root
3.2. Cài đặt LAMP
  tasks:
  - name: Install LAMP
    yum:
      name: '{{item}}'
      state: present
    with_items:
    - httpd
    - mariadb-server
    - mariadb
    - php
    - php-mysql
    - php-fpm
Cài đặt package cần thiết của LAMP
3.3. Đảm bảo các service cần thiết được bật và các port được thông.
  - name: Ensure service enabled and started
    service:
      name: '{{item}}'
      state: started
      enabled: True
    with_items:
    - mariadb
    - httpd
  - name: Ensure HTTP and HTTPS can pass the firewall
    firewalld:
      service: '{{item}}'
      state: enabled
      permanent: True
      immediate: True
    become: True
    with_items:
    - http
    - https
Khởi chạy các service mariadb, httpd. Đồng thời cho phép các gói tin http và https không bị chặn bởi firewall.
NOTE: Tìm hiểu module firewalld và hãy thử viết task “Ensure HTTP and HTTPS can pass the firewall” theo một cách khác nhé.
3.4. Tải, giải nén WordPress
  - name: Install php-gd,rsync
    yum:
      name: '{{item}}'
      state: present
    with_items:
    - php-gd
    - rsync
  - name: Restart httpd
    service:
      name: httpd
      state: restarted
  - name: Down wordpress
    get_url:
      url: http://wordpress.org/wordpress-5.3.2.tar.gz
      dest: /root
  - name: extract wordpress
    unarchive:
      src: /root/wordpress-5.3.2.tar.gz
      dest: /root
      remote_src: yes
  - name: rsync wordpress
    shell: rsync -avP /root/wordpress/ /var/www/html/
  - name: Create folder uploads
    shell: mkdir /var/www/html/wp-content/uploads
  - name: Set user:group
    shell: chown -R apache:apache /var/www/html/*
Tiến hành tải, giải nén WordPress và sao chép nội dung sang /var/www/html/
3.5. Tạo cơ sở dữ liệu, người dùng cho WordPress
  - name: Install MySQL-python
    yum:
      name: MySQL-python
      state: present
  - name: Create database wordpress
    mysql_db:
      name: wordpress
      state: present
  - name: Create user wordpressuser
    mysql_user:
      name: wordpressuser
      host: localhost
      password: wordpresspassword
      priv: 'wordpress.*:ALL'
      state: present

  - name: Backup file config wp
    shell: cp /var/www/html/wp-config-sample.php /var/www/html/wp-config.php
  - name: Config db name
    replace:
      path: /var/www/html/wp-config.php
      regexp: 'database_name_here'
      replace: 'wordpress'
  - name: Config username
    replace:
      path: /var/www/html/wp-config.php
      regexp: 'username_here'
      replace: 'wordpressuser'
  - name: Config password
    replace:
      path: /var/www/html/wp-config.php
      regexp: 'password_here'
      replace: 'wordpresspassword'
Ở đây chúng ta thực hiện tạo:
database: wordpress
username: wordpressuser
password: wordpresspassword
Sau đó tiến hành sửa file config: wp-config.php của WordPress theo các thông tin vừa tạo phía trên.
NOTE: Tôi đặc biệt lưu ý bạn cần phải cài đặt MySQL-python. Nếu không có nó, các module liên quan đến các thao tác với database phía dưới sẽ không thực hiện được.
3.6. Update version PHP
  - name: Config version PHP
    yum:
      name: '{{item}}'
      state: present
    with_items:
    - epel-release
    - yum-utils
    - http://rpms.remirepo.net/enterprise/remi-release-7.rpm
  - name: Config version PHP
    shell: yum-config-manager --enable remi-php72
  - name: Config version PHP
    yum:
      name: '{{item}}'
      state: present
    with_items:
    - php
    - php-common
    - php-opcache
    - php-mcrypt
    - php-cli
    - php-gd
    - php-curl
    - php-mysqlnd
  - name: Restart Apache
    service:
      name: httpd
      state: restarted
Đây chính là lỗi khi ta không thực hiện Update version của PHP
IV. Chạy Playbook
Việc còn lại duy nhất của chúng ta là ghép các phần phía trên lại thành 1 file yml hoàn chỉnh và chạy nó.
---
- hosts: centos7
  remote_user: root
  tasks:
  - name: Install LAMP
    yum:
      name: '{{item}}'
      state: present
    with_items:
    - httpd
    - mariadb-server
    - mariadb
    - php
    - php-mysql
    - php-fpm

  - name: Ensure service enabled and started
    service:
      name: '{{item}}'
      state: started
      enabled: True
    with_items:
    - mariadb
    - httpd
  - name: Ensure HTTP and HTTPS can pass the firewall
    firewalld:
      service: '{{item}}'
      state: enabled
      permanent: True
      immediate: True
    become: True
    with_items:
    - http
    - https

  - name: Install php-gd,rsync
    yum:
      name: '{{item}}'
      state: present
    with_items:
    - php-gd
    - rsync
  - name: Restart httpd
    service:
      name: httpd
      state: restarted
  - name: Down wordpress
    get_url:
      url: http://wordpress.org/wordpress-5.3.2.tar.gz
      dest: /root
  - name: extract wordpress
    unarchive:
      src: /root/wordpress-5.3.2.tar.gz
      dest: /root
      remote_src: yes
  - name: rsync wordpress
    shell: rsync -avP /root/wordpress/ /var/www/html/
  - name: Create folder uploads
    shell: mkdir /var/www/html/wp-content/uploads
  - name: Set user:group
    shell: chown -R apache:apache /var/www/html/*

  - name: Install MySQL-python
    yum:
      name: MySQL-python
      state: present
  - name: Create database wordpress
    mysql_db:
      name: wordpress
      state: present
  - name: Create user wordpressuser
    mysql_user:
      name: wordpressuser
      host: localhost
      password: wordpresspassword
      priv: 'wordpress.*:ALL'
      state: present

  - name: Backup file config wp
    shell: cp /var/www/html/wp-config-sample.php /var/www/html/wp-config.php
  - name: Config db name
    replace:
      path: /var/www/html/wp-config.php
      regexp: 'database_name_here'
      replace: 'wordpress'
  - name: Config username
    replace:
      path: /var/www/html/wp-config.php
      regexp: 'username_here'
      replace: 'wordpressuser'
  - name: Config password
    replace:
      path: /var/www/html/wp-config.php
      regexp: 'password_here'
      replace: 'wordpresspassword'

  - name: Config version PHP
    yum:
      name: '{{item}}'
      state: present
    with_items:
    - epel-release
    - yum-utils
    - http://rpms.remirepo.net/enterprise/remi-release-7.rpm
  - name: Config version PHP
    shell: yum-config-manager --enable remi-php72
  - name: Config version PHP
    yum:
      name: '{{item}}'
      state: present
    with_items:
    - php
    - php-common
    - php-opcache
    - php-mcrypt
    - php-cli
    - php-gd
    - php-curl
    - php-mysqlnd
  - name: Restart Apache
    service:
      name: httpd
      state: restarted
Lưu file với tên: playbook-wordpress.yml
Sau đó, chạy playbook và chờ khoảng 10 phút.
ansible-playbook -i /etc/ansible/hosts playbook-wordpress.yml
KẾT QUẢ:
V. Tổng kết
Vừa rồi tôi đã cùng bạn viết một playbook nhằm mục đích tự động hóa việc cài đặt WordPress trên môi trường CentOS 7.
Bạn cũng hoàn toàn có thể dựa vào những gợi ý của tôi, viết playbook của mình theo các cách khác, sử dụng các module khác.
Chúc các bạn thành công!!!!
Leave a Reply