LEMP là một nhóm các phần mềm có thể dùng để phục vụ các web động được viết bằng PHP. LEMP bao gồm một hệ điều hành Linux, web server Nginx, hệ quản trị cơ sở dữ liệu MySQL hoặc MariaDB và ngôn ngữ lập trình PHP. Trong bài viết này Cloud356 sẽ hướng dẫn bạn cách cài đặt LEMP stack trên CentOS 8 sử dụng MariaDB làm hệ quản trị cơ sở dữ liệu.
Chuẩn bị
Chuẩn bị một máy cài đặt hệ điều hành CentOS 8. Sử dụng user root để cài đặt.
Cài đặt
Bước 1: Cài đặt Nginx
Sử dụng trình quản lý gói dnf để cài đặt Nginx. Đây là trình quản lý gói mặc định trên CentOS 8
dnf install nginxSau khi cài đặt xong sử dụng lệnh sau để bật và enable nginx:
systemctl start nginx
systemctl enable nginx
Nếu bạn đang sử dụng firewalld bạn cần mở port để cho phép truy cập nginx
firewall-cmd --permanent --add-service=http
firewall-cmd --reload
Truy cập địa IP của bạn tren trình duyệt bạn sẽ thấy giao diện mặc định của Nginx
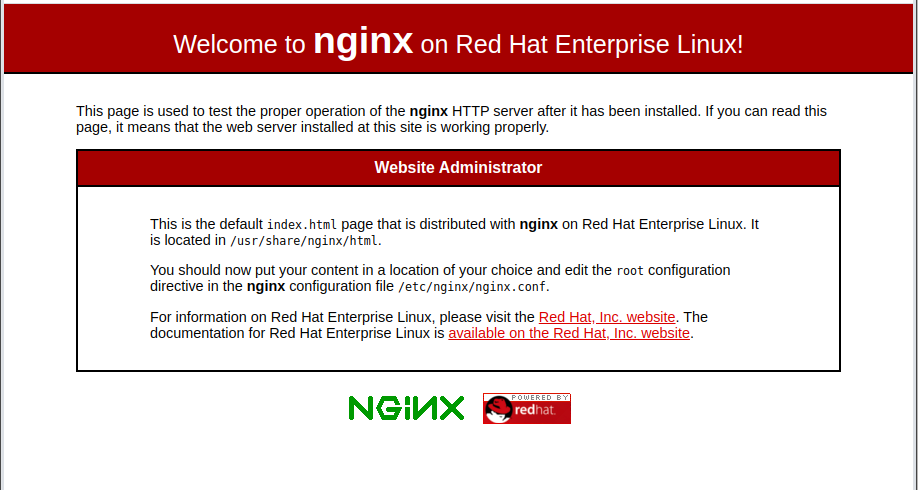
Nếu bạn thấy trang này thì máy chủ web của bạn đã được cài đặt.
Bước 2: Cài đặt MariaDB
Chúng ta cần cài đặt một hệ quản trị cơ sở dữ liệu để lưu trữ và quản lý dữ liệu cho trang web của bạn
dnf install mariadb-serverSau khi cài đặt xong sử dụng lệnh sau để bật và enable MariaDB
systemctl start mariadb
systemctl enable mariadb
Chạy lệnh sau để thiết lập cấu hình ban đầu cho user root của mariadb
mysql_secure_installationBạn sẽ được hỏi password của root. Nếu bạn mới cài mariadb thì bạn chỉ cần Enter để bỏ qua. Để đảm bảo tính bảo mật bạn nên đặt password cho tài khoản root
[root@localhost ~]# mysql_secure_installation

NOTE: RUNNING ALL PARTS OF THIS SCRIPT IS RECOMMENDED FOR ALL MariaDB
      SERVERS IN PRODUCTION USE!  PLEASE READ EACH STEP CAREFULLY!

In order to log into MariaDB to secure it, we'll need the current
password for the root user.  If you've just installed MariaDB, and
you haven't set the root password yet, the password will be blank,
so you should just press enter here.

Enter current password for root (enter for none):
OK, successfully used password, moving on...

Setting the root password ensures that nobody can log into the MariaDB
root user without the proper authorisation.

Set root password? [Y/n] Y
New password:
Re-enter new password:
Password updated successfully!
Reloading privilege tables..
 ... Success!


By default, a MariaDB installation has an anonymous user, allowing anyone
to log into MariaDB without having to have a user account created for
them.  This is intended only for testing, and to make the installation
go a bit smoother.  You should remove them before moving into a
production environment.

Remove anonymous users? [Y/n] Y
 ... Success!

Normally, root should only be allowed to connect from 'localhost'.  This
ensures that someone cannot guess at the root password from the network.

Disallow root login remotely? [Y/n] Y
 ... Success!

By default, MariaDB comes with a database named 'test' that anyone can
access.  This is also intended only for testing, and should be removed
before moving into a production environment.

Remove test database and access to it? [Y/n] Y
 - Dropping test database...
 ... Success!
 - Removing privileges on test database...
 ... Success!

Reloading the privilege tables will ensure that all changes made so far
will take effect immediately.

Reload privilege tables now? [Y/n] Y
 ... Success!

Cleaning up...

All done!  If you've completed all of the above steps, your MariaDB
installation should now be secure.

Thanks for using MariaDB!
Bây giờ thử đăng nhập với user root và password đặt ở bên trên
[root@localhost ~]# mysql -u root -p
Enter password:
Welcome to the MariaDB monitor.  Commands end with ; or \g.
Your MariaDB connection id is 16
Server version: 10.3.17-MariaDB MariaDB Server

Copyright (c) 2000, 2018, Oracle, MariaDB Corporation Ab and others.

Type 'help;' or '\h' for help. Type '\c' to clear the current input statement.

MariaDB [(none)]>
Đến đây việc cài đặt hệ quản trị cơ sở dữ liệu đã xong. Bây giờ chuyển sang cài đặt thành phần cuối cùng của bộ LEMP stack là PHP
Bước 3: Cài đặt PHP
Bạn đã cài đặt Nginx làm web server, MariaDB để lưu trữ và quản lý dữ liệu. Bây giờ bạn cần cài đặt PHP để xử lý code và tạo nội dung động cho trang web của bạn.
Cài đặt php-fpm và php-mysqlnd
dnf install php-fpm php-mysqlndphp-fpm có chức năng nói với Nginx chuyển các request PHP tới nó để xử lý. Còn php-mysqlnd cho phép PHP kết nối đến database.
Sau khi cài đặt xong ta cần phải thực hiện một số thay đổi về cấu hình để yêu cầu Nginx sử dụng PHP để xử lý nội dung.
sed -i 's/user = apache/user = nginx/g' /etc/php-fpm.d/www.conf
sed -i 's/group = apache/group = nginx/g' /etc/php-fpm.d/www.conf
Bật và enable php-fpm
systemctl start php-fpm
systemctl enable php-fpm
Khởi động lại nginx để load lại cấu hình của php-fpm
systemctl restart nginxĐến đây bạn đã cài đặt đầy đủ các thành phần cuả LEMP stack. Tiếp theo chúng ta sẽ sử dụng một script PHP để kiểm tra xem liệu nó có hoạt động như mong đợi.
Bước 4: Kiểm tra
Mặc định thư mục gốc cuả trang web sẽ là /usr/share/nginx/html. Bạn cũng có thể thay đổi thư mục này.
Tạo file info.php
cat <<EOF > /usr/share/nginx/html/info.php
<?php
phpinfo();
EOF
Bây giờ mở trình duyệt và truy cập đường dẫn http://ip_server/info.php. Nếu bạn thấy kết quả trả về như sau

Sau khi kiểm test xong thì nên xóa file này đi
rm /usr/share/nginx/html/info.phpĐến đây việc cài đặt đã thành công. Bạn có thể tham khảo cách cài đặt bộ công cụ này trên một số hệ điều hành khác tại đây.
Leave a Reply