Tiếp tục với series hướng dẫn cài đặt OpenStack bằng Kolla Ansible. Ở bài viết lần trước, Cloud365 đã gửi tới các bạn cách cấu hình OpenStack Train theo mô hình all-in-one. Hôm nay chúng mình sẽ mang đến cho các bạn hướng dẫn triển khai OpenStack Train theo mô hình multinode với Kolla Ansible. Nếu đây là lần đầu tiên bạn đọc bài viết này, xin vui lòng tham khảo bài viết phần 1 của Cloud365 về Kolla Ansible tại đây.
Mục lục
Yêu cầu
Chuẩn bị 2 máy ảo với hệ điều hành CentOS 7 với cấu hình:
Controller:
- CPU >= 4
- Ram >= 8GB
- Disk:
- vda – OS (>= 50 GB)
- vdb – Cinder LVM (>= 50 GB)
- Network: 2 interface
- Dải MNGT + API + Internal Network: 10.10.11.0/24
- Dải Provider hay External Network: 10.10.12.0/24
Compute:
- CPU >= 4
- Ram >= 8GB
- Disk:
- vda – OS (>= 50 GB)
- Network: 2 interface
- Dải MNGT + API + Internal Network: 10.10.11.0/24
- Dải Provider hay External Network: 10.10.12.0/24
Trong bài, VM của mình sẽ có IP:
Controller:
- eth0: 10.10.11.171
- eth1: 10.10.12.171
Compute:
- eth0: 10.10.11.172
- eth1: 10.10.12.172
Cài đặt
Phần 1. Chuẩn bị
Trên node Controller:
Đặt hostname
hostnamectl set-hostname controllerCấu hình Network
echo "Setup IP eth0"
nmcli c modify eth0 ipv4.addresses 10.10.11.171/24
nmcli c modify eth0 ipv4.gateway 10.10.11.1
nmcli c modify eth0 ipv4.dns 8.8.8.8
nmcli c modify eth0 ipv4.method manual
nmcli con mod eth0 connection.autoconnect yes

echo "Setup IP eth1"
nmcli c modify eth1 ipv4.addresses 10.10.12.171/24
nmcli c modify eth1 ipv4.method manual
nmcli con mod eth1 connection.autoconnect yes
Update hệ điều hành
yum install -y epel-release
yum update -y
Tắt Firewall, SELinux
sed -i 's/SELINUX=enforcing/SELINUX=disabled/g' /etc/sysconfig/selinux
sed -i 's/SELINUX=enforcing/SELINUX=disabled/g' /etc/selinux/config
systemctl stop firewalld
systemctl disable firewalld
Cấu hình đồng bộ thời gian
timedatectl set-timezone Asia/Ho_Chi_Minh

yum -y install chrony
sed -i 's/server 0.centos.pool.ntp.org iburst/ \
server 1.vn.pool.ntp.org iburst \
server 0.asia.pool.ntp.org iburst \
server 3.asia.pool.ntp.org iburst/g' /etc/chrony.conf
sed -i 's/server 1.centos.pool.ntp.org iburst/#/g' /etc/chrony.conf
sed -i 's/server 2.centos.pool.ntp.org iburst/#/g' /etc/chrony.conf
sed -i 's/server 3.centos.pool.ntp.org iburst/#/g' /etc/chrony.conf

systemctl enable chronyd.service
systemctl restart chronyd.service
chronyc sources
Tạo phân vùng Cinder LVM
pvcreate /dev/vdb
vgcreate cinder-volumes /dev/vdb
Cài đặt môi trường Python, Ansible
yum install -y python-devel libffi-devel gcc openssl-devel libselinux-python
yum install -y vim git byobu
curl -Lo- https://bootstrap.pypa.io/get-pip.py | python

pip install -U pip

pip install ansible

mkdir -p /etc/ansible

txt="[defaults]\nhost_key_checking=False\npipelining=True\nforks=100"
echo -e $txt >> /etc/ansible/ansible.cfg
Tắt máy và snapshot lại
Trên node Compute
Đặt hostname
hostnamectl set-hostname controllerCấu hình Network
echo "Setup IP eth0"
nmcli c modify eth0 ipv4.addresses 10.10.11.172/24
nmcli c modify eth0 ipv4.gateway 10.10.11.1
nmcli c modify eth0 ipv4.dns 8.8.8.8
nmcli c modify eth0 ipv4.method manual
nmcli con mod eth0 connection.autoconnect yes

echo "Setup IP eth1"
nmcli c modify eth1 ipv4.addresses 10.10.12.172/24
nmcli c modify eth1 ipv4.method manual
nmcli con mod eth1 connection.autoconnect yes
Tắt Firewall, SELinux
sed -i 's/SELINUX=enforcing/SELINUX=disabled/g' /etc/sysconfig/selinux
sed -i 's/SELINUX=enforcing/SELINUX=disabled/g' /etc/selinux/config
systemctl stop firewalld
systemctl disable firewalld
Update hệ điều hành
yum install -y epel-release
yum update -y
Cấu hình đồng bộ thời gian
timedatectl set-timezone Asia/Ho_Chi_Minh

yum -y install chrony
sed -i 's/server 0.centos.pool.ntp.org iburst/ \
server 1.vn.pool.ntp.org iburst \
server 0.asia.pool.ntp.org iburst \
server 3.asia.pool.ntp.org iburst/g' /etc/chrony.conf
sed -i 's/server 1.centos.pool.ntp.org iburst/#/g' /etc/chrony.conf
sed -i 's/server 2.centos.pool.ntp.org iburst/#/g' /etc/chrony.conf
sed -i 's/server 3.centos.pool.ntp.org iburst/#/g' /etc/chrony.conf

systemctl enable chronyd.service
systemctl restart chronyd.service
chronyc sources
Cài đặt môi trường
yum install -y python-devel libffi-devel gcc openssl-devel libselinux-python
yum install -y vim git byobu
Tắt máy và snapshot lại
Phần 2. Cài đặt Kolla Ansible trên node Controller
Tải bản kolla-ansible 9.0.0 (bản dành cho OpenStack Train)
pip install "kolla-ansible==9.0.0"
mkdir -p /etc/kolla

cp /usr/share/kolla-ansible/etc_examples/kolla/* /etc/kolla/

cp /usr/share/kolla-ansible/ansible/inventory/* .
Chỉnh sửa file multinode
Tại section [control], điền IP node Controller
[control]
10.10.11.171 ansible_connection=ssh     ansible_user=root
Tại section [network], điền IP node Controller
[network]
10.10.11.171 ansible_connection=ssh     ansible_user=root
Tại section [monitoring], điền IP node Controller
[monitoring]
10.10.11.171 ansible_connection=ssh     ansible_user=root
Tại section [storage], điền IP các Controller
[storage]
10.10.11.171 ansible_connection=ssh     ansible_user=root
Tại section [deployment], điền IP node kolla ansible (vì ở đây ta cài đặt kolla ansible trên Controller nên ta sẽ để là localhost)
[deployment]
localhost  ansible_connection=ssh
Tại section [compute], điền IP node compute
Lưu ý: Nếu bạn có nhiều hơn 1 node compute thì thêm các dòng đó xuống phía dưới nhé.
[compute]
10.10.11.172 ansible_connection=ssh     ansible_user=root
Kiểm tra
ansible -i multinode all -m pingTạo key pair và copy qua các node controller và compute (Nhập pass khi được yêu cầu)
ssh-keygen
ssh-copy-id root@10.10.11.171
ssh-copy-id root@10.10.11.172
Phần 3. Cài đặt Openstack Train bằng Kolla Ansible
Lưu ý: Các thao tác này được thực hiện trên node Controller
Gen password
kolla-genpwdCấu hình Kolla Openstack
cp /etc/kolla/globals.yml /etc/kolla/globals.yml.bak
cat << EOF > /etc/kolla/globals.yml
---
kolla_base_distro: "centos"
kolla_install_type: "source"
openstack_release: "train"

# Không sử dụng HA Controller (VIP RabbitMQ, MariaDB v.v)
# enable_haproxy: "no"

# Dải Mngt + admin, internal API
kolla_internal_vip_address: "10.10.11.175"
network_interface: "eth0"

# Dải Mngt Provider
neutron_external_interface: "eth1"

# Cho phép neutron sử dụng dải provider
enable_neutron_provider_networks: "yes"

nova_compute_virt_type: "qemu"

keepalived_virtual_router_id: "60"

enable_cinder: "yes"
enable_cinder_backend_lvm: "yes"
enable_cinder_backup: "no"
EOF
Lưu ý:
- kolla_internal_vip_address là ip dùng cho VIP, nó sẽ là một IP trống và nằm cùng dải với IP của card mgnt + api
- Trường hợp cùng dải đã có máy chạy keepalived thì ta sẽ phải đổi tham số router_id trong file cấu hình keepalived bằng cách chỉnh tham số keepalived_virtual_router_id trong file cấu hình kolla.
- Nếu bạn đang lab trên máy ảo thì bạn cần phải chỉnh tham số nova_compute_virt_type về qemu như cấu hình trên.
Kiểm tra lại cấu hình
cat /etc/kolla/globals.yml | egrep -v '^#|^$'Sử dụng byobu để chống mất phiên khi thực hiện việc triển khai kolla-ansible để cài OpenStack
byobuThực hiện các bước cài đặt OpenStack bằng kolla-ansible.
Khởi tạo môi trường dành cho Openstack Kolla
kolla-ansible -i multinode bootstrap-serversKiểm tra thiết lập Kolla Ansible
kolla-ansible -i multinode prechecksCài đặt Openstack
kolla-ansible -i multinode deployThiết lập File Environment Openstack
kolla-ansible -i multinode post-deployPhần 4. Cài đặt Openstack Client
Cài đặt các gói cần thiết để tạo virtualenv
pip install virtualenv
virtualenv venv
Tạo virtualen có tên là venv
. venv/bin/activateCài đặt các gói openstack client trong virtualenv
pip install python-openstackclient python-glanceclient python-neutronclient
source /etc/kolla/admin-openrc.sh
Kiểm tra xem OpenStack hoạt động hay chưa
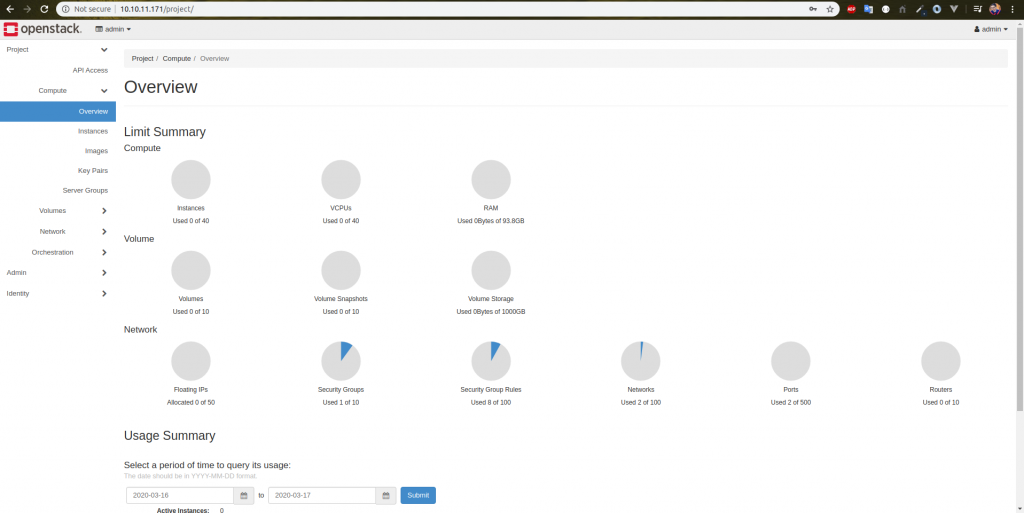
openstack token issueTới đây bạn đã cài Openstack Train thành công
Phần 5. Đăng nhập vào Horizon
Lấy mật khẩu tài khoản Admin
cat /etc/kolla/passwords.yml | grep keystone_adminKết quả
keystone_admin_password: rucy2VQN6Nm6Y9uQheBBVhnzX06IRrZVKVFjdcfZTới đây, mật khẩu đăng nhập vào Horizon sẽ là:
admin/rucy2VQN6Nm6Y9uQheBBVhnzX06IRrZVKVFjdcfZ
Truy cập vào horizon với địa chỉ : http://10.10.11.171, nhập thông tin đăng nhập ở trên.
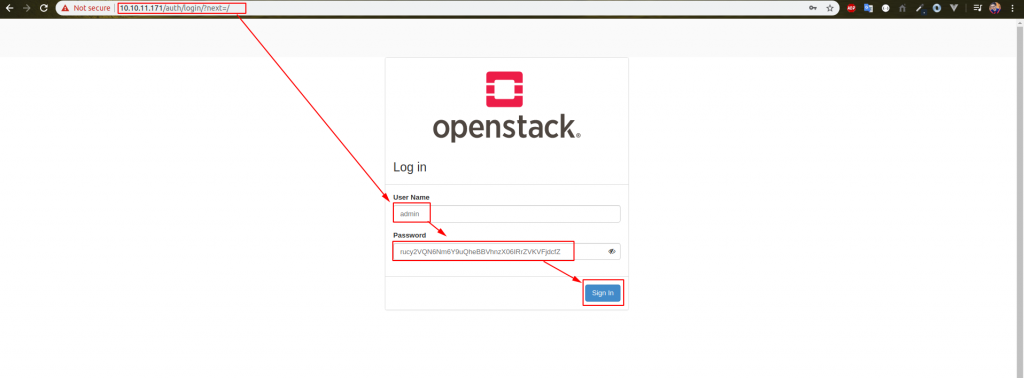
Sau khi thao tác xong, chọn Sign In
Như vậy là chúng ta đã cài đặt thành công OpenStack Train bằng Kolla Ansible. Để biết cách sử dụng hệ thống ta vừa thiết lập, mời các bạn tham khảo bài hướng dẫn tạo máy ảo trên cụm OpenStack được cài đặt bằng Kolla Ansible ở phần 3 của series này.
Pạn ơi cài kolla này các service chạy neutron, mariadb, cinder nhưng vào container cần quyền root thì pass là gì nhỉ ?
Bạn kiểm tra file /etc/kolla/passwords.yml giúp mình nhé
Ad ơi cho mình hỏi khi mình cài đặt openstack multinote thì khi tạo instance thì instance đó sẽ đi ra ngoài thiết bị vật lý theo eth1 của compute node hay controller node vậy Ad ? Mình cám ơn.