Sau khi cài đặt và thiết lập TIG stack xong, việc cài đặt domain cũng như tạo chứng chỉ là một bước không thể thiếu.
Trong bài viết này, Cloud365 sẽ hướng dẫn các bạn cấu hình Nginx với SSL làm Reverse Proxy cho trang Grafna.
Mục lục
Mô hình và IP Planing
1. Cấu hình trên Nginx server
2. Cấu hình trên TIG-server
Kết luận
Mô hình và IP planing
Mô hình
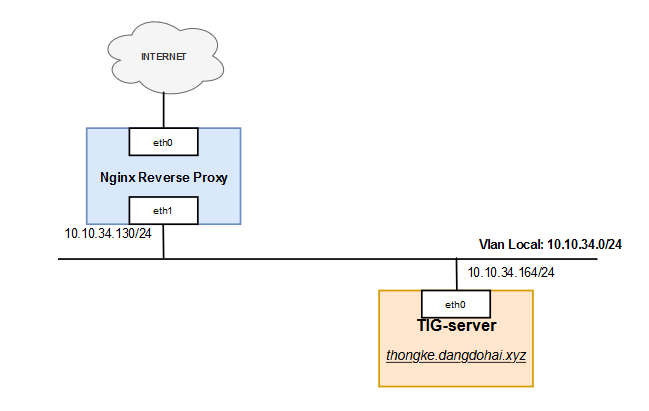
IP Planing

Các thao tác trên TIG server và Nginx server thực hiện với quyền root.
1. Cấu hình trên Nginx server
Bước 1: Cài đặt Nginx
1. Cài đặt Nginx
apt uptdate
apt install nginx -y
2. Cấu hình firewall
ufw allow 'Nginx HTTP' 3. Backup file cấu hình
cp /etc/nginx/nginx.conf /etc/nginx/nginx.conf.bkBước 2: Tạo file config site
1. Trước khi tạo file config cho địa chỉ truy cập, ta cần kiểm tra bản ghi DNS đối với địa chỉ sẽ sử dụng :
nslookup thongke.dangdohai.xyz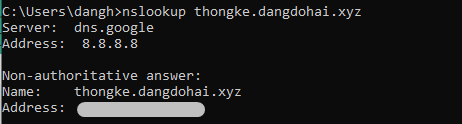
Nếu chưa tạo 1 bản ghi tên miền, hãy truy cập zonedns để đăng kí và tạo 1 bản ghi.
2. Tạo file config site
Sau khi kiểm tra bản ghi đã tồn tại, ta sẽ tạo file config của tên miền, mỗi site sẽ được khai báo tương ứng với 1 file nằm trong thư mục /etc/nginx/conf.d/.
Tạo file có tên là tên miền của bạn với phần mở rộng là .conf và thêm vào file với nội dung như sau:
vi /etc/nginx/conf.d/thongke.dangdohai.xyz.confThêm vào file nội dung sau:
server {
 server_name thongke.dangdohai.xyz;
     location / {
         proxy_set_header   X-Real-IP             $remote_addr;
         proxy_set_header   X-Forwarded-For     $proxy_add_x_forwarded_for;

         proxy_set_header X-Forwarded-Proto https;
         proxy_pass http://10.10.34.164;
     }
 }
3. Kiểm tra file cấu hình và khởi động lại nginx
Kiểm tra file cấu hình
nginx -t

nginx: the configuration file /etc/nginx/nginx.conf syntax is ok
nginx: configuration file /etc/nginx/nginx.conf test is successful
Restart nginx:
systemctl restart nginx Bước 3: Thiết lập chứng chỉ Let’s Encrypt
1. Cài đặt Certbot
apt install python-certbot-nginx -y 2. Sinh SSL bằng Let’s Encrypt cho site thongke.dangdohai.xyz
certbot --nginx -d thongke.dangdohai.xyzWaiting for verification...
Cleaning up challenges
Deploying Certificate to VirtualHost /etc/nginx/conf.d/thongke.dangdohai.xyz.conf
Please choose whether or not to redirect HTTP traffic to HTTPS, removing HTTP access.
- - - - - - - - - - - - - - - - - - - - - - - - - - - - - - - - - - - - - - - -
1: No redirect - Make no further changes to the webserver configuration.
2: Redirect - Make all requests redirect to secure HTTPS access. Choose this for
new sites, or if you're confident your site works on HTTPS. You can undo this
change by editing your web server's configuration.
- - - - - - - - - - - - - - - - - - - - - - - - - - - - - - - - - - - - - - - -
Select the appropriate number [1-2] then [enter] (press 'c' to cancel): 2
Redirecting all traffic on port 80 to ssl in /etc/nginx/conf.d/thongke.dangdohai.xyz.conf
- - - - - - - - - - - - - - - - - - - - - - - - - - - - - - - - - - - - - - - -
Congratulations! You have successfully enabled https://thongke.dangdohai.xyz
You should test your configuration at:
https://www.ssllabs.com/ssltest/analyze.html?d=thongke.dangdohai.xyz
- - - - - - - - - - - - - - - - - - - - - - - - - - - - - - - - - - - - - - - -
IMPORTANT NOTES:
- Congratulations! Your certificate and chain have been saved at:
/etc/letsencrypt/live/thongke.dangdohai.xyz/fullchain.pem
Your key file has been saved at:
/etc/letsencrypt/live/thongke.dangdohai.xyz/privkey.pem
Your cert will expire on 2020-08-09. To obtain a new or tweaked
version of this certificate in the future, simply run certbot again
with the "certonly" option. To non-interactively renew *all* of
your certificates, run "certbot renew"
- If you like Certbot, please consider supporting our work by:
Donating to ISRG / Let's Encrypt: https://letsencrypt.org/donate
Donating to EFF: https://eff.org/donate-le3. Kiểm tra lại kết quả trong file config site
Sau khi sinh ssl cho site, ta kiểm tra lại file config để thấy sự thay đổi.
cat /etc/nginx/conf.d/thongke.dangdohai.xyz.conf server {
server_name thongke.dangdohai.xyz;
location / {
proxy_set_header X-Real-IP $remote_addr;
proxy_set_header X-Forwarded-For $proxy_add_x_forwarded_for;
proxy_set_header X-Forwarded-Proto https;
proxy_pass http://10.10.34.164:3000;
}
listen 443 ssl; # managed by Certbot
ssl_certificate /etc/letsencrypt/live/thongke.dangdohai.xyz/fullchain.pem; # managed by Certbot
ssl_certificate_key /etc/letsencrypt/live/thongke.dangdohai.xyz/privkey.pem; # managed by Certbot
include /etc/letsencrypt/options-ssl-nginx.conf; # managed by Certbot
ssl_dhparam /etc/letsencrypt/ssl-dhparams.pem; # managed by Certbot
}
server {
if ($host = thongke.dangdohai.xyz) {
return 301 https://$host$request_uri;
} # managed by Certbot
server_name thongke.dangdohai.xyz;
listen 80;
return 404; # managed by Certbot
}4. Khởi động lại Nginx
systemctl restart nginx 2. Cấu hình trên TIG server
1. Mở file cấu hình Grafana và chỉnh sửa
vi /etc/grafana/grafana.iniTìm đến phần [server], chỉnh sửa các dòng sau: ;protocol , domain , root_url
;protocol: sửa thành;protocol = httpsdoamin: Điền domain mà bạn sử dụng cho trang Grafana. Trong bài viết này sẽ làdomain = thongke.dangdohai.xyzroot_url = %(protocol)s://%(domain)s/

2. Restart service
Sau khi chỉnh sửa và lưu lại file, tiến hành restart service
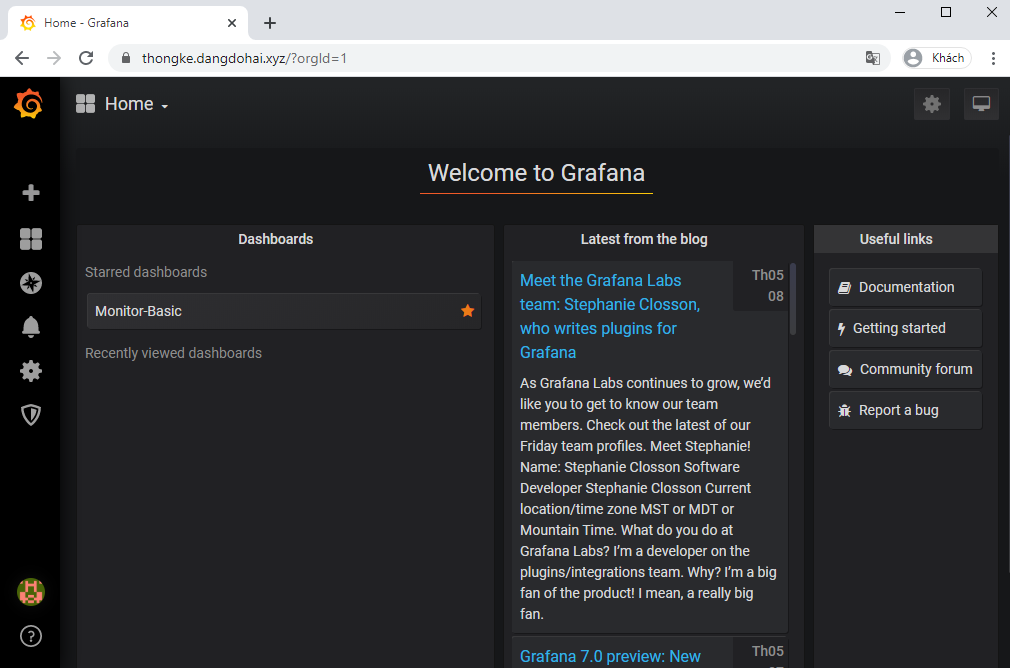
systemctl restart grafana-server3. Truy cập domain đã đặt để kiểm tra kết quả:
Trong bài viết này sẽ là: https://thongke.dangdohai.xyz/

Ta thấy trang của ta đã có thể truy cập và có SSL.
Đăng nhập vào Grafana:
Kết luận
Trên đây là hướng dẫn của Cloud365 về cách cấu hình Nginx làm Reverse Proxy cho Grafana trên Ubuntu server 18.04 LTS.
Xem thêm các bài viết về TIG stack.
Chúc các bạn thành công.
Leave a Reply